Let's start with the final product. This is a recently-metamorphosed Wood Frog (Lithobates sylvaticus) sitting on a penny. When taking this photo, I knew I wanted a completely clean, white background, and I knew I wanted something in the photo for size reference.
To achieve that look, I created this super simple setup. I used a white piece of computer paper for the backdrop, and I propped this paper up so it would curl upward. For my camera setup, I used a Nikon D5100 DSLR, an 85mm Nikon macro lens, and a Nikon SB-700 external flash. I then mounted my camera and flash on a tripod to allow for easier control. I shoot all of my photos in manual mode, meaning I select what settings the camera will use to expose a photo. I also shoot all of my photos in the RAW format, which I will talk about later. For this photo, I set my aperture to f/20, my shutter speed to 1/200th of a second, my ISO to 125, and my external flash to 1/8th power. In addition, I had Cassie hold up a small reflector on the right side of the backdrop. This reflector allowed some of the flash's light to be reflected back toward the frog from the side, ensuring that the frog's stomach was not underexposed. Finally, and most importantly, I placed the frog on the penny and shot the photo.
This was the RAW photo straight out of the camera. At this point in time, no post-processing had been done. As you can see, the overall temperature is rather cool (meaning there is a blue tint), and the subject is rather small and dull. This is to be expected. As I mentioned earlier, I shoot using the RAW format. Generally speaking, RAW photos tend to be dull and flat.
So why shoot in RAW? The benefit of shooting RAW lies in the flexibility of this file type. The RAW format records a lot of detailed color data, which is what you want. The downside is that the straight-RAW photo is almost always dull and flat; the data is there, but it is "compressed." This means that a RAW photo must be edited to bring out the colors and details that are already present in the file's coding, but just subdued.
We now have the RAW photo, so next we have to begin editing it. For this part, I use Adobe Lightroom. First I remove the chromatic aberration in the photo. Then I crop the photo to get rid of any excess space. Finally, I begin to do whole-photo edits to the exposure. For this part, I first changed the temperature of the photo by making it warmer, as it was initially too cool (i.e. too "blue"). Then I decreased the highlights, brought the shadows up a bit, and then increased the saturation and vibrancy a tad. For my final edit at this stage, I increased the whites a great deal. By increasing the whites, the white paper backdrop began to lose detail. I didn't want the viewer to look at the background and be able to tell it is a piece of paper. I want the focus to be on the frog and the penny, not the background.
Next began the spot editing portion. When shooting amphibians with a flash, their moist skin tends to result in blown out areas. In an attempt to remedy this, I used Lightroom's brush feature to go in and highlight the overexposed or blown out areas of the face, which you can see in the photo above. I then decreased the highlights, shadows, and overall exposure of this highlighted area to recover some of the details that would otherwise be lost.
After this was done, I began using another post-processing program called the Google Nik Collection. Nik is a powerful program that used to cost nearly $200, but Google recently bought it and made it free to use! If you are interested in downloading it, check out this link: Nik Collection. I use it as a plugin for Lightroom. The first Nik plugin I use in my workflow is called Dfine. Dfine is a very useful plugin which "intelligently" smooths out unwanted grain and noise in the photo by automatically analyzing and spot-editing the noise. It's a super useful plugin.
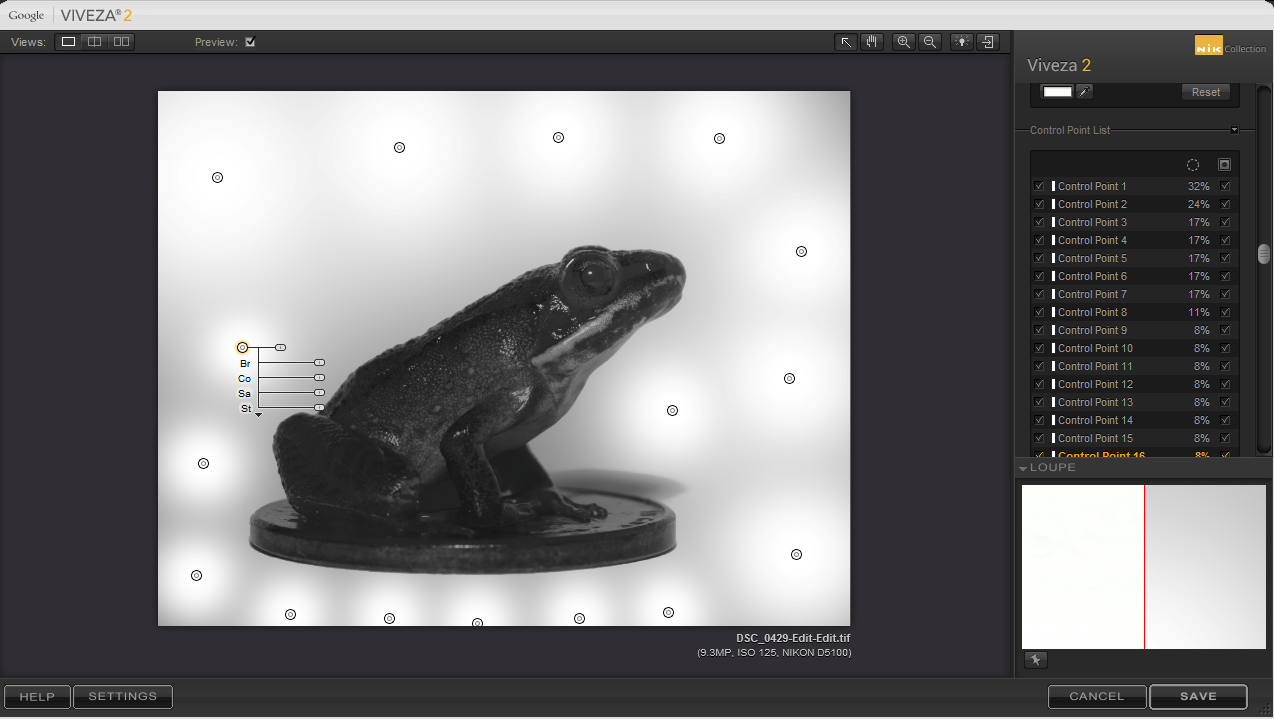
Next I use another Nik plugin called Viveza. This program allows you to do more whole-and-spot editing. Like I said before, I wanted to lose all detail in the background and have it only exist as a white color. To work toward this goal, I added nearly 20 "control points" to the background using Viveza. Viveza has this awesome setting where you can view where your control points are exactly altering the photo. If you look at the photo above, you can see that some areas are super dark, while other areas are super white. Portions that a control point will greatly influence and alter will show up white, while portions that a given control point won't alter will be black. As you can see, the background is white, while the frog is black. That's exactly what I wanted for now. I then turn this informational view off and decrease the "Structure" setting in Viveza. The Structure setting can either bring out or strip away fine details in a photo. By decreasing the structure in the background, I'm washing away any remaining detail of the paper I used.
Then I do the exact opposite with the frog. I want the fine details of the frog to show up crisp and clean. To do this, I add several control points to the frog, using the helpful informational display to ensure that I'm only going to affect the frog and not the background. After making sure the frog is covered adequately, I switch off this informational display and increase the structure of the frog.
I save the photo file from Viveza and then open it back up in Lightroom. By this stage, I'm almost done with post-processing and all that remains are any trouble areas that I missed up to this point. I noticed that my flash reflected oddly in the bottom half of the frog's eye, giving it a gray wash in the bottom half that stood out in an unattractive manner. I used Lightroom's brush feature to try and tackle this problem. I applied a total of 3 separate brush areas to the eye, each with a different set of edits. My goal was to get rid of the gray wash that covered the bottom half of the eye.
 |
| Before (left) and after (right). |
And finally, after about 20 minutes of editing, the final product was nearing completion. The only remaining steps were to export the file to a JPEG format, apply some slight sharpening to the entire photo, and add a watermark. And with that, the photo is done.
Taking a photo is only half the battle in photography. Post-processing is an integral step in creating a finalized product that the photographer is happy about. The world of post-processing is complicated, however, with an array of programs available and nearly unlimited stylistic choices and tools to utilize. Hopefully this post gave you a window into my personal workflow. Although the details vary from photo to photo, and case to case, the overall process I explained in this post is how most of my photos are generally post-processed.


